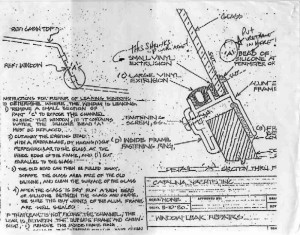
Note:Â Catalina Direct will soon offer the vinyl extrusion that originally fit between the window glass and the aluminum frame.
Tools Necessary for Repairing Leaks
1. Razor blade
2. Paper towels
3. Polysulfide sealant 3 oz. or 12 oz. tube
Window leakages can occur in two areas:
1. Where the window is installed to the boat
2. The window itself between frame and glass.
A simple way of identifying these leakage areas is to:
1. Pull the black vinyl on the inside of the window up to check for water in the channel. If the water is there, then the leak is between the frame and the glass.
2. If Step 1 shows no water then the leak is between the installation of the frame to the boat.
The following are steps for repairing the leakage between the frame and the glass:
1. Using a razor blade, cut the outside bead between the frame and the glass completely out.
2. Clean the area from which the sealant has just been removed with a paper towel. This area must be completely dry in order for the silicone to take a bond when re-apply to the frame.
3. When redressing the window with the polysulfide(I prefer black colored sealant), it is imperative that the sealant go all the way into the frame itself between the glass and frame creating a bead similar to the one that was removed. Be sure that you do have a completed bead all the way around the entire until with no gappage. The window must then dry for 24 hours. To check the window for any further leaks, water can then be applied on the glass.
If the leak is not filling the channel, the leak is between the outside frame and the cabin side:
1. Remove the inside frame ring.
2. Remove the window frame and clean away existing bedding.
3. Rebed the window with polysulfide sealant(I prefer white colored sealant) and replace the window frame and inside ring.

